What do you give the neighbors as an "I am so sorry my chickens at the "hens and chicks" plants that belonged to your parents" gift? And what are the odds that the chickens would eat a plant called "hens and chicks?"
Would a stew chicken be out of line?

Wednesday, July 20, 2011
Tuesday, July 12, 2011
Friendly Feta! (With Bonus Pasteurization Lesson!)
Feta is not my favorite. Now don't get me wrong, I like Feta. It just doesn't make me feel all melty and gluttonous like other cheeses do. Feta is good in moderation with other ingredients to temper it's strong personality, while some other cheeses (in my opinion) are best in hunks straight off the plate.
Many other people don't seem to feel this way. I get feta requests all the time and recently my daughters BFF's dad went bananas describing this "awesome" cheese he had just had (it's called feta! have you heard of it?). Add to this that it's one of my favorite cheeses to make (if not eat) and I thought I would do a Friendly Feta batch this week. AND post about it. WITH PICTURES.
Oh! I also have new toys! 1) a "smart phone" have you heard of these? they shoot my pictures straight over here so I can post them! and 2) a balls awesome thermometer. I have many temperature specific hobbies so it is not unreasonable to spend $100 on a thermometer (she says defensively) FUN!
OK! Lets Make Feta!!!!
1) Milk your goat! I used 1 gallon from my evening milking and a little over a half gallon more from the morning. You can also use store (or farm) bought goat or cow milk. About a gallon and a half.

2) Pasteurize! Feta is a fresh cheese (eaten less than 60 days after it is made) so it is safest to pasteurize your milk first. Also heating goat milk tends to intensify the "goaty" flavor, which is desirable in this cheese. You can pasteurize milk several ways. You can heat the milk in a double boiler to 145 degrees and hold it at that temperature for 30 minutes. OR you can heat the milk in a double boiler to 162 degrees and hold it at that temperature for 15 seconds. OR you can heat it to like 200 or something for like 1 second (which is what they do to grocery store milk) but you can't really do that at home and it totally ruins the proteins so you can't make cheese with it anymore.
3) Chill the milk! Quick! Put the milk in an icy water bath and cool that bitch down! If you were pasteurizing for home drinking you would want to take it down below 50 degrees or so, but since this is for cheese I only took it to 86 degrees, which is where I want it to encourage my cheesy bacterial friends to grow.
4) Add cultures! You can use a general "mesophilic" culture for this cheese and get good results. But I am a cheese-o-phile and a big snob and got special (ooooo) cultures. I used 1/4 teaspoon M101 and 1/8 teaspoon Aroma B. But seriously, you can use a packet of mesophilic starter and get very good results. Sprinkle cultures on to the milk and let them sit there for about 2-4 minutes, then stir them in with 20 up and down strokes. Cover the pot and ripen (sit there) for 45 minutes.
5) Coagulate! Add your rennet. I used 1/2 teaspoon diluted in about 1/4 cup of cool water. If you are using cow milk you can add about 1/8 teaspoon of lipase powder (to give it that special flavor), you can also add about 1/2 teaspoon of calcium chloride if you like. Stir with 20 up and down strokes again. And the let it sit for an additional 30-45 minutes until your curd is set.
6) Test for a clean break! This is the funnest part! Check to makes sure you are ready to cut the curd by making sure it breaks cleanly first. Like this:
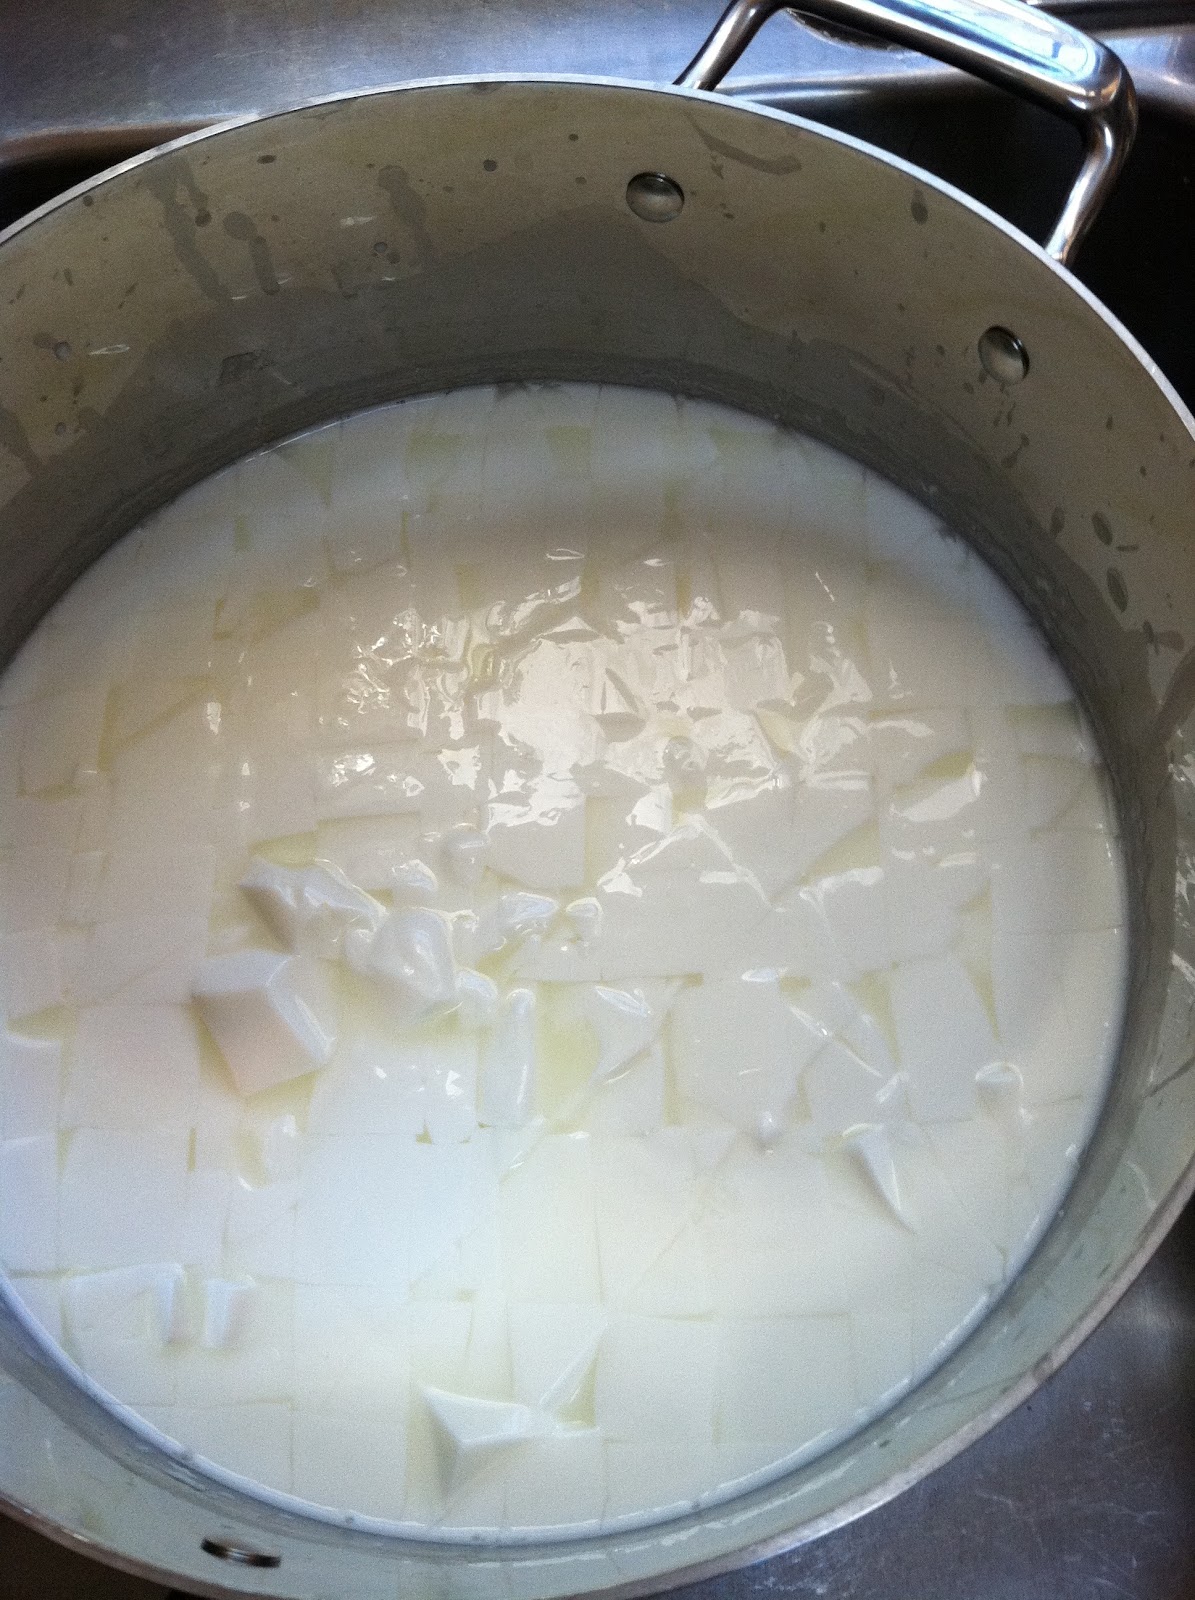
7) Cut the Curd! Into 1/2 inch cubes and then let it sit for 5 minutes.
8) Stir for 20 minutes. Holding at 86 to 90 degrees. I use warm water baths to keep my temperatures stable.
9) Scoop the curds into a mold (really any mold, even a bag probably) and let it drain for 6-8 hours, turning every few hours so it drains evenly. I drain mine on a draining board inside of a 9x5 baking pan draining the whey when it gets too deep.
10) Cut the cheese into cubes and soak in brine for 3 days in your fridge. I use a "medium" brine made with 10 oz of salt in 1/2 gallon of water. You can leave the cheese in this brine for storage for about a month.
11) Eat the Cheese! When you are ready to eat the cheese you may think "holy hell! this cheese is crazy salty." Don't worry! You can soak it in water for 15 minutes, or even up to a few hours and it will be much improved. Crumble it on salad! Or a Pizza! Mix it into scrambled eggs! Or just eat it plain! You can do whatever you want with it! Look at my family enjoying this cheese!
And that is how you make feta cheese! BOOM!
Many other people don't seem to feel this way. I get feta requests all the time and recently my daughters BFF's dad went bananas describing this "awesome" cheese he had just had (it's called feta! have you heard of it?). Add to this that it's one of my favorite cheeses to make (if not eat) and I thought I would do a Friendly Feta batch this week. AND post about it. WITH PICTURES.
Oh! I also have new toys! 1) a "smart phone" have you heard of these? they shoot my pictures straight over here so I can post them! and 2) a balls awesome thermometer. I have many temperature specific hobbies so it is not unreasonable to spend $100 on a thermometer (she says defensively) FUN!
OK! Lets Make Feta!!!!
1) Milk your goat! I used 1 gallon from my evening milking and a little over a half gallon more from the morning. You can also use store (or farm) bought goat or cow milk. About a gallon and a half.
2) Pasteurize! Feta is a fresh cheese (eaten less than 60 days after it is made) so it is safest to pasteurize your milk first. Also heating goat milk tends to intensify the "goaty" flavor, which is desirable in this cheese. You can pasteurize milk several ways. You can heat the milk in a double boiler to 145 degrees and hold it at that temperature for 30 minutes. OR you can heat the milk in a double boiler to 162 degrees and hold it at that temperature for 15 seconds. OR you can heat it to like 200 or something for like 1 second (which is what they do to grocery store milk) but you can't really do that at home and it totally ruins the proteins so you can't make cheese with it anymore.
 |
| Steamy! 163.9 degrees |
 |
| Perfect! |
 |
| Stirring . . . |
 |
| Rennet in a bowl. |
 |
| Yay! |
 |
| Cutting . . . |
 |
| Cut. |
8) Stir for 20 minutes. Holding at 86 to 90 degrees. I use warm water baths to keep my temperatures stable.
 |
| Curds and Whey |
 |
| Baby Cheese |
 |
| Cheese in Brine. |
11) Eat the Cheese! When you are ready to eat the cheese you may think "holy hell! this cheese is crazy salty." Don't worry! You can soak it in water for 15 minutes, or even up to a few hours and it will be much improved. Crumble it on salad! Or a Pizza! Mix it into scrambled eggs! Or just eat it plain! You can do whatever you want with it! Look at my family enjoying this cheese!
 |
| I love Feta! |
 |
| This cheese is sooo good! |
 |
| Holy Crap! This is the best ever! Yay for mom! No mom is as good as ours! |
Monday, July 11, 2011
Sunday, July 10, 2011
It's Curtains for You!
I am a recovering pack rat.
Collecting design ideas is one way I can channel my hoarding tendencies. I cut them out of magazines and file them in a binder full of clear sheet protectors. (Yes, I'm a bit type A as well). I figure I can "collect" design ideas for years and never fill the spare bedroom or devote the garage to nick-knacks like baby elephant figurines or framed photos of lighthouses. Anyway, I digress, I was looking through the binder today and came across this page.

Now I originally collecte it because I liked what they did with the yellow trim on the pillows. Yellow is my favorite color and I'm always looking for tasteful ways to incorporate it into my home (read: anything but blue and yellow country ducks in the kitchen).
Anyway I also have this problem:
Anyway I also have this problem:

You may not really notice the "problem" until I tell you but I got cheap and bought two smaller blinds (the ones that look like reeds). This design trick, hang curtains longer than your windows and then obscure the wall above the actual end of the window with a decorative blind, gives the effect of tall, elegant sweeping windows when, in actuality, the windows are standard height. Well as you can see the blinds are split and don't really pull this off.
Enter my design binder...for the genius solution!
Did you see it?
Look again...
Look again...
Okay, I'll help you, the curtains are in the middle of this window! Well, at least some of them are. So in the easiest design solution I've EVER executed...I... get this... Pulled the curtains in!!!
TA-DA!
Can you tell I'm excited?
Anyway it was easy and I'm pretty tickled.
A few other notes about the curtains.
I bought oversized pannels from Ikea for something like $24 a pair.
I also bought curtain rods and little clippy rings. No idea what the technical term for those could possibly be. I cut off the tabs on the top, remember I'm going for sweeping/elegant/modern not "cute", and folded them over until the bottoms of the panel just touch the carpet. Voila!


Not this many design ideas are this easy.
It's almost like design drive through.
It's almost like design drive through.
You could do this with a babe in one arm.
You could do it after a night of partying.
You could do it after a night of partying.
Heck, a 3 year old could execute this one.
This is not a derogatory statement about three year olds.
Tall "custom length" curtains for less than $300! (wayy less than $300).
You could even do this with a sheet in a tasteful color.
You could even do this with a sheet in a tasteful color.
So, Go forth BODC-ers, and move your curtains!
Subscribe to:
Posts (Atom)